
This week T and I made a Valentine's Day craft in preparation for Valentine's Day. While I much prefer to create our own crafts, T saw a a valentine's robot kit in Michael's when we were shopping for his birthday party and he decided that's what he wanted to make. The following is a how to for creating your own robot without having to purchase a kit.

Materials:
One large tissue box
Paint
Valentine's stickers
Red construction or card stock paper
Adhesive tabs
Glue or tape
Scissors
One small box - like that from a deck of cards or a bar of soap
One medium sized box - for the head - this can be a mac and cheese box, a taco box, a small tissue box, pretty much any size you want the head to be
Red pipe cleaner
2 small pom poms
sticker eyes or googly eyes
Let's get started!!

Directions:
1. First step is to attach your 3 boxes. Your large tissue box is the body. The opening is the belly where you can insert valentine cards. On top of that goes the small box for the neck and then then medium box on top for the head.

2. Since your robot won’t come with ready matching boxes, you get to paint your robot! This will probably be a lot more fun than trying make the boxes with your toddler’s assistance… Plus, each robot will be unique!
3. Next we decorate our robot with stickers. You can add eyes to the head and an assortment of sticker to the body.
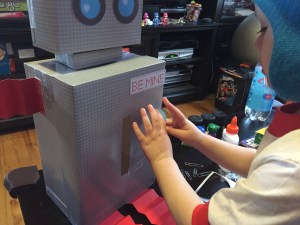
4. Next, cut your red paper into four 2 inch wide strips. Fold these accordion style with each fold about a 1/2″ apart. Glue, tape or adhere these to the body of your robot for the arms and legs. With additional paper, you can create hand or feet for your robot. A nice foot shape would be to cut out to matching semi circles, decorate them and then attach them to the ends of the legs.

5. Finally the finishing touches! The adult should use the scissors and make 2 small holes on the top of the robot’s head. Here you will stick the two ends of the red pipe cleaner. Then bend the pipe cleaner to look like the electrical current powering your robot. Lastly, cut out 4 small circles from your red paper. Create the following layers twice: adhesive tab – circle – adhesive tab – circle – adhesive tab – small pom pom. Attach these to either side of the robot’s head for his antennae. You can see this on the right side of the robot picture above.
This is a fun project for toddlers. I especially think they will love painting their own robots. As a bonus, this is a good valentine mailbox for their valentine's day cards and treats.
I hope you try out this project!!
Happy Valentine's Day
Emily


This is a super fun Valentine’s Day craft project perfect for toddlers, preschoolers, and young kids. The frame is the perfect gift for your children to make for the ones they love.