
Disclaimer: The Multitasking Mom is a participant in the Amazon Services LLC Associates Program, an affiliate advertising program designed to provide a means for us to earn fees by linking to Amazon.com and affiliated sites. Anything linked within this post are items that the author, herself, would purchase and all other content continues to be the author's own opinion.
Iron on transfers are great for for making t-shirts, tote bags, pillow cases, and more. Once you know how to apply your own images to fabric with the use of iron on transfer sheets, the possibilities are truly endless! You can make matching shirts for the whole family, an apron for your favorite chef, and so many other gifts for friend, family, or yourself.
Whether you're making custom shirts for your kid's sports team, or creating the perfect gift for your best friend, iron on transfers provide an cheap and easy way to apply images to fabric.
Step 1: Find Unique Images
The first step in creating your one of a kind item is of course finding an image that you'd like to transfer.
An important thing to consider when choosing an image is that light colors may not have the same results as solid, dark colors. You'll likely be printing the iron on transfer with your home printer, and printers don't actually print white ink, they just assume the background color of your paper is white and ignore white in the image.
This means that if your image has white in it, the iron on transfer be clear in those areas, so whatever was originally white in your image will end up the color of the fabric on your shirt. In addition, very light colors may also appear transparent making for a muddy image. It's best to stick with solid colors that will be rich with ink and really show the contrast of your image against the fabric.
On the other hand, if you plan to print your image on a dark colored shirt or dark fabric, you'll need to get special iron on transfer paper for dark fabrics. This paper has a white background instead of a clear background, which allows for white and light colors but with other restrictions (We'll discuss this more in the next step).
You can check out my Etsy Shop for cute Easter Images which can be transferred onto t-shirts or totes.
Note that if you intend to sell the product you create with the iron on transfer, you need to make sure that you have rights to the image. You can just use an image you find on Google when you intend to sell the item. You can find lots of images on Etsy that allow for sale of the products you make, or you can create your own images!
Step 2: Choose Your Iron on Transfer Sheets
There are basically two different types of iron on transfer sheets: one for light fabrics, and one for dark fabrics.
Iron on Transfer Sheets for Light Fabrics
These iron on transfer sheets are for white and other light colors of fabric. The paper is transparent, so the background of your image will appear clear, as will any part of the image that is white. Be careful because any white parts of the image will appear the color of the fabric.
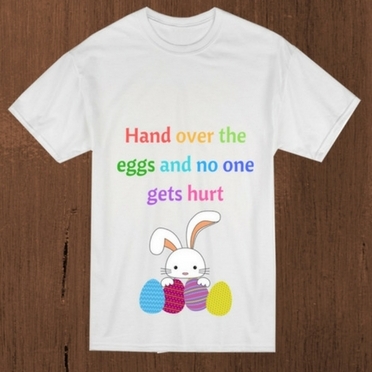
For example, the image below would only work on a white fabric when using transfer sheets for light fabrics unless you want an odd colored bunny.

Light colors may not appear accurate after being transfered, so it is best to stick with medium to dark colors when using this type of transfer paper. Although the background of the transfer paper is clear, you'll likely want to trim around the edge of your design, as the clear area can still sometimes be slightly visible.
Iron on Transfer Sheets for Dark Fabrics
If your shirt or fabric is a dark color like black, dark gray, or dark blue, you'll want to buy iron on transfer sheets for dark fabrics. These sheets are thicker and have a white backing, which allows you to use white and light colors in the image or design. The problem with this type of transfer paper is that with the background appearing white, you can't have part of your image appear clear. Therefore, you have to carefully cut around any letters or other design elements or have the white background be part of your design.
So in the example above, if you didn't cut out all the letters and images, you'd have a big white square with the image in the middle of your dark shirt.
There are a bunch of different brands of both light and dark fabric transfer sheets. You can find these sheets in craft stores or online on sites like Amazon. Different brands have different quality sheets. Definitely check out the reviews on Amazon to hep you choose the best brand for your project.
Step 3: How to Print Your Design Onto Transfer Paper
Now that you have the image you want to use and you have your transfer sheets, it's time to print your image onto the transfer paper. Keep in mind that if you're using iron on transfer sheets for light fabrics, you'll need to reverse the image otherwise it will appear backwards when you transfer it. You can usually do this right from the print settings by selecting reverse or flip horizontally.
If you don't have a print setting to reverse the image while printing, you can find free tools to do it online by searching Google for reverse image tools. If you're using iron on transfers for dark fabrics, you do NOT want to reverse the image! It will appear on the shirt as it appears on the printed transfer page.
The only other thing to consider while printing is to make sure that you are printing your design on the right side of the iron on transfer sheet. You might want to load a paper with something written on one side and test print something to make sure you load the transfer sheet correctly.
Step 4: How to Trim and Transfer Your Design
Regardless of the type of transfer paper you're using, you'll want to trim around your design, staying as close to the image edges as possible. If you're using iron on transfers for lights, do NOT peel off the backing until after you've ironed on the design. If you're using iron on transfer paper for darks, you do need to peel off the backing before ironing on the design. To be safe, always check your transfer paper's instructions.
When you're ready to iron on the design, make sure to use a hard, flat surface underneath. Unlike normal ironing, you don't want to use an ironing board for iron on transfers. Set your iron to the hottest setting, but NEVER USE STEAM! You want to avoid any moisture that could ruin your transfer.

Before ironing on your design, you first want to iron the actual shirt or fabric to make sure it is wrinkle free. If you're using iron on transfers for lights, place the image side of your transfer sheet down. If you're using transfers for darks, the image side should be face up. Some dark fabric iron on transfer sheets include parchment paper or another paper to put in between the transfer sheet and the iron.
Iron the design onto the fabric with firm pressure, applying pressure evenly across the whole area of the image, especially the edges. Keep applying firm even pressure as you iron the design onto the fabric for about 3 or 4 minutes. Before you finish, check the edges of the transfer and make sure they have adhered to the fabric. If they don't appear evenly adhered, continue ironing and applying even pressure to the edges of the transfer until they do.
After ironing the design onto the shirt, let the transfer to cool for several minutes before removing the paper backing (for lights) or the parchment paper (for darks). Now you have a custom shirt or tote bag, or pillow, or apron, or whatever else you can think of!!
If you are looking for a fun Easter shirt for your upcoming egg hunt or Easter Bunny pic, check out my Etsy Shop for cute images perfect for white shirts!
Cheers,
Emily